uiautomator2 是一个 python 库,用于 Android 的 UI 自动化测试,其底层基于 Google uiautomator,Google 提供的 uiautomator 库可以获取屏幕上任意一个 APP 的任意一个控件属性,并对其进行任意操作
python-uiautomator2 封装了谷歌自带的 uiautomator2 测试框架,提供便利的 python 接口。他允许测试人员直接在 PC 上编写 Python 的测试代码,操作手机应用,完成自动化,大大提高了自动化代码编写的效率。
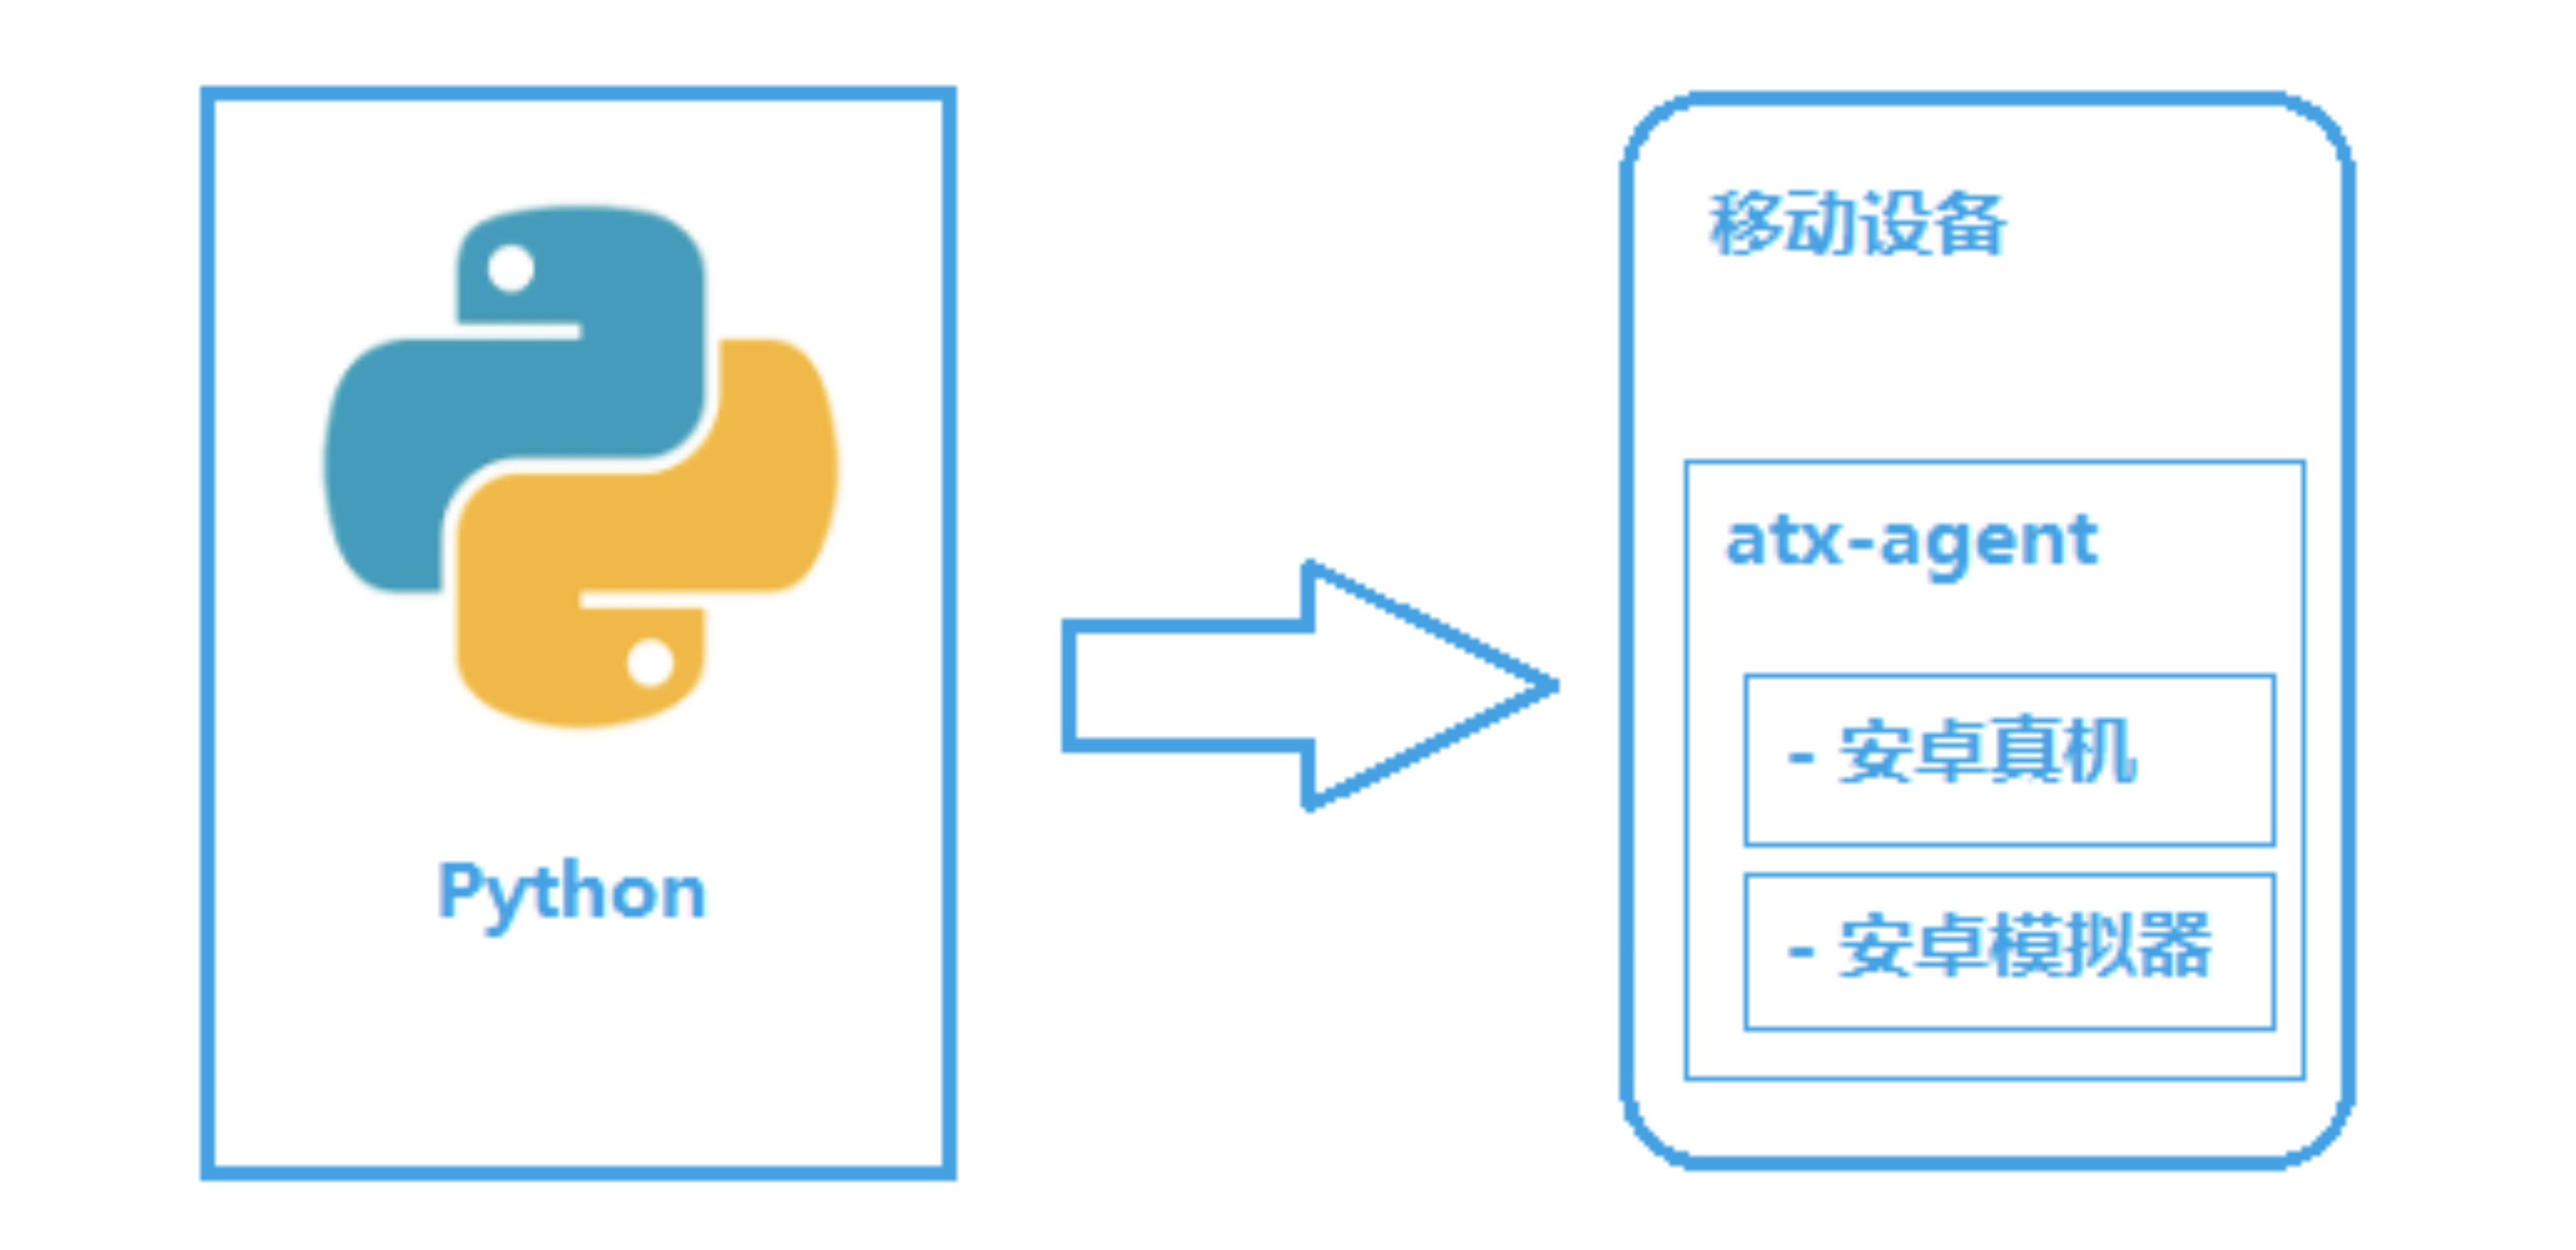
整个过程
在移动设备上安装 atx-agent(守护进程), 随后 atx-agent 启动 uiautomator2 服务 (默认 7912 端口) 进行监听
在 PC 上编写测试脚本并执行(相当于发送 HTTP 请求到移动设备的 server 端)
移动设备通过 WIFI 或 USB 接收到 PC 上发来的 HTTP 请求,执行制定的操作
如命令行可以执行 adb devices,则跳过此步骤https://developer.android.com/studio/releases/platform-tools.html, 解压,并加包含 adb.exe 的目录加入到系统的 PATH 中。
1 pip install --upgrade --pre uiautomator2
首先设备连接到 PC,并能够 adb devices 发现该设备。执行下面的命令会自动安装本库所需要的设备端程序:uiautomator-server,atx-agent,openstf / minicap,openstf / minitouch
1
2
3
4
5
6
7
8
# init就是所有USB连接电脑的手机上都安装uiautomator2 python -m uiautomator2 init # 指定手机安装uiautomator2, 用 --mirror python -m uiautomator2 init --mirror --serial $SERIAL # 嫌弃慢的话,可以用国内的镜像 python -m uiautomator2 init --mirror
最后提示 success,代表 atx-agent 初始化成功。
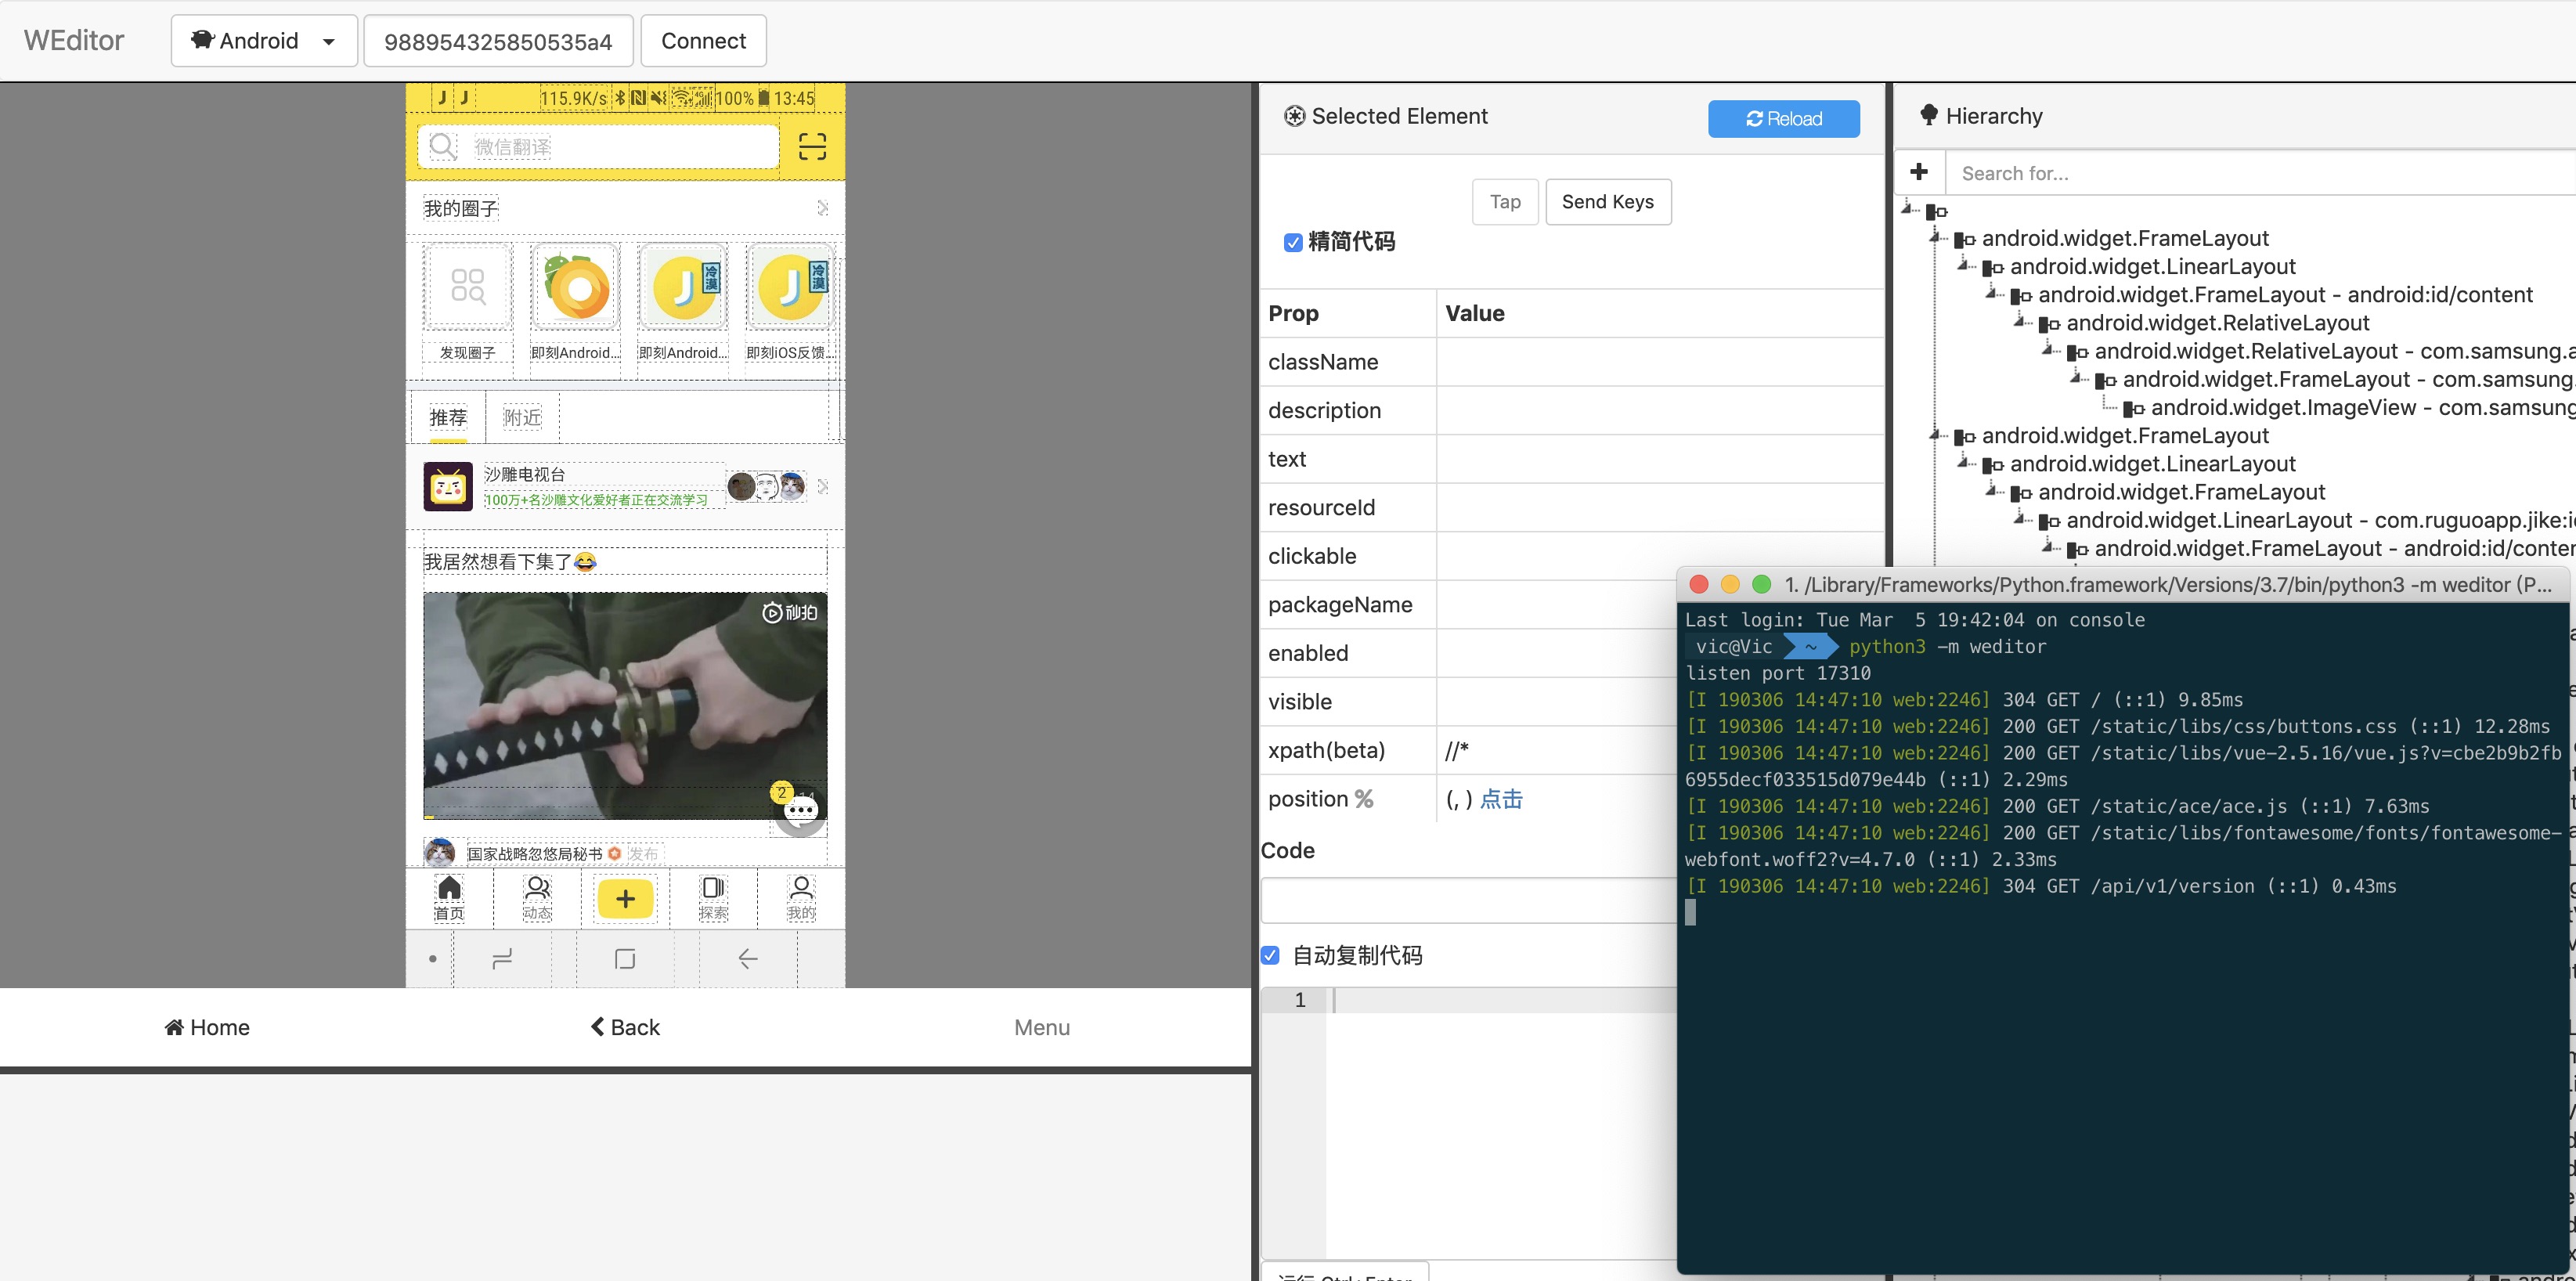
有了这个,方便我们快速的识别手机上的元素,方便写代码
1 pip install --pre -U weditor#pip install --pre weditor
Windows 系统可以使用命令在桌面创建一个快捷方式 python -m weditor –shortcut
启动方法:
浏览器会自动打开一个网页 http://atx.open.netease.com,看到如下界面
重点说下这个部分
AppetizerIO 提供了对 uiautomator2 的深度集成,可以图形化管理 ATX 设备,还有所见即所得脚本编辑器
设备管理 界面里可以检查设备是否正常 init,起停 atx-agent,抓取 atx-agent.log 文件APP测试->脚本助手调出脚本助手,实时界面同步,点击界面直接插入各种代码,同时支持 uiautomator 和 Appium视频教程 请戳这里 其他文档在此
配置手机设备参数,设置具体操作的是哪一台手机
抓取手机上应用的控件,制定对应的控件来进行操作
抓取手机上应用的控件,制定对应的控件来进行操作抓取手机上应用的控件,制定对应的控件来进行操作
python-uiautomator2 连接手机的方式有两种,一种是通过 WIFI,另外一种是通过 USB。两种方法各有优缺点。
通过 WiFi,假设设备 IP 192.168.5.4 和您的 PC 在同一网络中
1
2
import uiautomator2 as u2 d = u2.connect('192.168.5.4') # WIFI链接设备。或者u2.connect_wifi('10.0.0.1')
通过 USB, 假设设备序列是 123456789F(见 adb devices)
1
2
3
import uiautomator2 as u2 d = u2.connect('123456789F') # USB链接设备。或者u2.connect_usb('123456f') #d = u2.connect_usb()#当前只有一个设备时可以用这个
在没有参数的情况下调用 u2.connect(), uiautomator2 将从环境变量 ANDROID_DEVICE_IP 获取设备 IP。如果这个环境变量是空的,uiautomator 将返回 connect_usb,您需要确保只有一个设备连接到计算机。
1 d.service('uiautomator').stop()
1
2
3
4
5
6
7
8
d.debug = True d.info 返回 12:32:47.182 $ curl -X POST -d '{"jsonrpc": "2.0", "id": "b80d3a488580be1f3e9cb3e926175310", "method": "deviceInfo", "params": {}}' 'http://127.0.0.1:54179/jsonrpc/0' 12:32:47.225 Response >>> {"jsonrpc":"2.0","id":"b80d3a488580be1f3e9cb3e926175310","result":{"currentPackageName":"com.android.mms","displayHeight":1920,"displayRotation":0,"displaySizeDpX":360,"displaySizeDpY":640,"displayWidth":1080,"productName" :"odin","screenOn":true,"sdkInt":25,"naturalOrientation":true}}
1 d.app_install('http://some-domain.com/some.apk')#引号内为下载apk地址
1 d.app_start('com.ruguoapp.jike')#引号内为包名称
1
2
3
4
#相当于'am force-stop'强制停止应用 d.app_stop('com.example.hello_world') #相当于'pm clear' 清空App数据 d.app_clear('com.example.hello_world')
1
2
3
4
# 停止所有 d.app_stop_all() # 停止所有应用程序,除了com.examples.demo d.app_stop_all(excludes=['com.examples.demo'])
1
2
d.disable_popups()#自动跳过弹出窗口 d.disable_popups(假)#禁用自动跳过弹出窗
Session 表示应用程序的生命周期。可用于启动应用,检测应用崩溃
1
2
sess = d.session("com.netease.cloudmusic") # start 网易云音乐 sess.close() # 停止网易云音乐
1
2
with d.session("com.netease.cloudmusic") as sess: sess(text="Play").click()
1 sess = d.session(“ com.netease.cloudmusic ”,attach = True)
1
2
3
4
5
6
7
8
9
# App 正在运行时 sess(text="Music").click() # 操作是正常的 # App 崩溃时 sess(text="Music").click() # 引发会话中断错误 SessionBrokenError # session 下的其他函数调用也会引发 SessionBrokenError 错误
1
2
3
4
5
# 检查会话是否正确。 # 警告:函数名将来可能会更改 sess.running() # True or False
以下是可能的输出:
1
2
3
4
5
6
7
8
9
10
11
{ u'displayRotation': 0, u'displaySizeDpY': 640, u'displaySizeDpX': 360, u'currentPackageName': u'com.android.launcher', u'productName': u'takju', u'displayWidth': 720, u'sdkInt': 18, u'displayHeight': 1184, u'naturalOrientation': True }
1
2
3
4
5
d.window_size() # 设备垂直输出示例: (1080, 1920) # 设备水平输出示例: (1920, 1080)
获取当前应用程序信息。对于某些 android 设备,输出可以为空 (参见输出示例 3)
1
2
3
4
5
6
7
d.current_app() # 输出示例 1: {'package': 'com.netease.example', 'activity': '.Client', 'pid': 23710} # 输出示例 2: {'package': 'com.ruguoapp.jike', 'activity': 'com.ruguoapp.jike.business.video.ui.activity.videolist.VideoListActivity'} # 输出示例 3: {'package': None, 'activity': None}
1
2
3
d.serial # 输出示例: 74aAEDR428Z9
1 print(d.wlan_ip) #输出示例:10.0.0.1
下面是一个可能的输出:
1
2
3
4
5
6
7
8
9
10
11
12
13
14
15
16
17
18
19
20
21
22
23
24
25
{'udid': '3578298f-b4:0b:44:e6:1f:90-OD103', 'version': '7.1.1', 'serial': '3578298f', 'brand': 'SMARTISAN', 'model': 'OD103', 'hwaddr': 'b4:0b:44:e6:1f:90', 'port': 7912, 'sdk': 25, 'agentVersion': 'dev', 'display': {'width': 1080, 'height': 1920}, 'battery': {'acPowered': False, 'usbPowered': False, 'wirelessPowered': False, 'status': 3, 'health': 0, 'present': True, 'level': 99, 'scale': 100, 'voltage': 4316, 'temperature': 272, 'technology': 'Li-ion'}, 'memory': {'total': 3690280, 'around': '4 GB'}, 'cpu': {'cores': 8, 'hardware': 'Qualcomm Technologies, Inc MSM8953Pro'}, 'presenceChangedAt': '0001-01-01T00:00:00Z', 'usingBeganAt': '0001-01-01T00:00:00Z'}
1
2
3
4
5
6
7
8
9
10
11
12
13
14
15
16
17
18
19
20
21
22
d.app_info("com.examples.demo") # 会输出 #{ # "mainActivity": "com.github.uiautomator.MainActivity", # "label": "ATX", # "versionName": "1.1.7", # "versionCode": 1001007, # "size":1760809 #} # 保存应用程序图标 img = d.app_icon("com.examples.demo") img.save("icon.png")
1
2
3
4
5
6
7
8
9
10
11
12
13
14
15
16
# push 文件夹 d.push("foo.txt", "/sdcard/") # push 和重命名 d.push("foo.txt", "/sdcard/bar.txt") # push fileobj with open("foo.txt", 'rb') as f: d.push(f, "/sdcard/") # 推动和更改文件访问模式 d.push("foo.sh", "/data/local/tmp/", mode=0o755)
1
2
3
4
5
6
d.pull("/sdcard/tmp.txt", "tmp.txt") # 如果在设备上找不到文件,FileNotFoundError 将引发 d.pull("/sdcard/some-file-not-exists.txt", "tmp.txt")
1
2
d.screen_on()#打开屏幕 d.screen_off()#关闭屏幕
1 d.info.get(' screenOn ')#需要 Android> = 4.4
1
2
3
4
5
6
7
8
9
10
11
12
13
14
15
16
17
d.press("home") # 点击 home 键 d.press("back") # 点击 back 键 d.press("left") # 点击左键 d.press("right") # 点击右键 d.press("up") # 点击上键 d.press("down") # 点击下键 d.press("center") # 点击选中 d.press("menu") # 点击 menu 按键 d.press("search") # 点击搜索按键 d.press("enter") # 点击 enter 键 d.press("delete") # 点击删除按键 d.press("recent") # 点击近期活动按键 d.press("volume_up") # 音量+ d.press("volume_down") # 音量- d.press("volume_mute") # 静音 d.press("camera") # 相机 d.press("power") #电源键
你可以在 Android KeyEvnet 上找到所有的关键代码定义
1
2
3
4
5
6
7
d.unlock() # 相当于 # 1. 发射活动:com.github.uiautomator.ACTION_IDENTIFY # 2. 按 home 键
1
2
d.double_click(x,y) d.double_click(X,Y,0.1)#默认两个单击之间间隔时间为 0.1 秒
1
2
d.long_click(x,y) d.long_click(X,Y,0.5)#长按 0.5 秒(默认)
1
2
d.swipe(sx, sy, ex, ey) d.swipe(sx, sy, ex, ey, 0.5) #滑动 0.5s(default)
1
2
d.drag(sx, sy, ex, ey) d.drag(sx, sy, ex, ey, 0.5)#拖动 0.5s(default)
1
2
#从点(x0, y0)滑到点(x1, y1)再滑到点(x2, y2) #两点之间的滑动速度是 0.2 秒 d.swipe((x0, y0), (x1, y1), (x2, y2), 0.2)
注意:单击,滑动,拖动操作支持百分比位置值。例:
1 d.long_click(0.5, 0.5) 表示长按屏幕中心
1
2
3
d.orientation # 检索方向。输出可以是 "natural" or "left" or "right" or "upsidedown"
1
2
3
4
d.set_orientation('l') # or "left" d.set_orientation("l") # or "left" d.set_orientation("r") # or "right" d.set_orientation("n") # or "natural"
1
2
d.freeze_rotation()# 冻结旋转 d.freeze_rotation(False)# 开启旋转
1
2
3
4
5
6
7
8
9
10
11
12
13
14
15
16
17
18
19
# 截图并保存到电脑上的一个文件中,需要 Android>=4.2。 d.screenshot("home.jpg") # 得到 PIL.Image 格式的图像. 但你必须先安装 pillow image = d.screenshot() # default format="pillow" image.save("home.jpg") # 或'home.png',目前只支持 png 和 jpg 格式的图像 # 得到 OpenCV 的格式图像。当然,你需要 numpy 和 cv2 安装第一个 import cv2 image = d.screenshot(format='opencv') cv2.imwrite('home.jpg', image) # 获取原始 JPEG 数据 imagebin = d.screenshot(format='raw') open("some.jpg", "wb").write(imagebin)
1
2
3
# get the UI hierarchy dump content (unicoded).(获取 UI 层次结构转储内容) d.dump_hierarchy()
1
2
d.open_notification()#下拉打开通知栏 d.open_quick_settings()#下拉打开快速设置栏
选择器是一种方便的机制,用于在当前窗口中标识特定的 UI 对象。
1
2
#选择带有文本'Clock'的对象,它的类名是'android.widget.TextView' d(text='Clock', className='android.widget.TextView')
选择器支持以下参数。有关详细信息,请参阅 UiSelector Java doc for detailed information.
text, textContains, textMatches, textStartsWithclassName, classNameMatchesdescription, descriptionContains, descriptionMatches, descriptionStartsWithcheckable, checked, clickable, longClickablescrollable, enabled,focusable, focused, selectedpackageName, packageNameMatchesresourceId, resourceIdMatchesindex, instance
获取所选 ui 对象状态及其信息
1
2
3
d(text="Settings").exists # 返回布尔值,如果存在则为 True,否则为 False d.exists(text="Settings") # 另一种写法 #高级用法 d(text="Settings").exists(timeout=3) # 等待'Settings'在 3 秒钟出现
下面是一个可能的输出
1
2
3
4
5
6
7
8
9
10
11
12
13
14
15
16
17
18
19
20
21
22
23
24
25
26
27
{ 'bounds': { 'bottom': 2744, 'left': 386, 'right': 478, 'top': 2679}, 'childCount': 0, 'className': 'android.widget.TextView', 'contentDescription': None, 'packageName': 'com.ruguoapp.jike', 'resourceName': 'com.ruguoapp.jike:id/tv_main_tab_title', 'text': '动态', 'visibleBounds': { 'bottom': 2744, 'left': 386, 'right': 478, 'top': 2679}, 'checkable': False, 'checked': False, 'clickable': False, 'enabled': True, 'focusable': False, 'focused': False, 'longClickable': False, 'scrollable': False, 'selected': False }
获取 / 设置 / 清除可编辑字段的文本 (例如 EditText 小部件)
1
2
3
d(text="Settings").get_text() #得到文本小部件 d(text="Settings").set_text("My text...") #设置文本 d(text="Settings").clear_text() #清除文本
1
2
d(text="Settings").center() #d(text="Settings").center(offset=(0, 0)) # 基准位置左前
1
2
3
4
5
6
7
8
9
10
11
12
13
#text 定位单击 d(text="Settings").click() d(text="Settings", class).click() #resourceId 定位单击 d(resourceId="com.ruguoapp.jike:id/tv_title", class).click() #description 定位单击 d(description="设置").click() d(description="设置", class).click() #className 定位单击 d(class).click() #xpath 定位单击 d.xpath("//android.widget.FrameLayout[@index='0']/android.widget.LinearLayout[@index='0']").click() #坐标单击 d.click(182, 1264)
1
2
3
4
5
6
7
8
9
10
11
12
13
14
15
16
17
# 等待元素出现(最多 10 秒),出现后单击 d(text="Settings").click(timeout=10) # 在 10 秒时点击,默认的超时 0 d(text='Skip').click_exists(timeout=10.0) # 单击直到元素消失,返回布尔 d(text="Skip").click_gone(maxretry=10, interval=1.0) # maxretry 默认值 10,interval 默认值 1.0 # 点击基准位置偏移 d(text="Settings").click(offset=(0.5, 0.5)) # 点击中心位置,同 d(text="Settings").click() d(text="Settings").click(offset=(0, 0)) # 点击左前位置 d(text="Settings").click(offset=(1, 1)) # 点击右下
1
2
d(text="设置").double_click() #双击特定 ui 对象的中心 d.double_click(x, y, 0.1)#两次单击之间的默认持续时间为 0.1 秒
1
2
3
4
# 长按特定 UI 对象的中心 d(text="Settings").long_click() d.long_click(x, y, 0.5) # 长按坐标位置 0.5s 默认
特定 UI 对象的手势操作
1
2
3
4
5
6
7
8
9
# Android<4.3 不能使用 drag. # 在 0.5 秒内将 UI 对象拖到屏幕点(x, y) d(text="Settings").drag_to(x, y, duration=0.5) # 将 UI 对象拖到另一个 UI 对象的中心位置,时间为 0.25 秒 d(text="Settings").drag_to(text="Clock", duration=0.25)
从 UI 对象的中心向其边缘滑动
1
2
3
4
d(text="Settings").swipe("right") d(text="Settings").swipe("left", steps=10) d(text="Settings").swipe("up", steps=20) # 1步约为5ms, 20步约为0.1s d(text="Settings").swipe("down", steps=20)
1 d(text="Settings").gesture((sx1, sy1), (sx2, sy2), (ex1, ey1), (ex2, ey2))
特定 UI 对象的手势操作
1
2
3
4
#注意:缩放要到安卓 4.3 才能设置。 #从边缘到中心 d(text="Settings").pinch_in(percent=100, steps=10) # 从中心到边缘 d(text="Settings").pinch_out()
1
2
3
4
5
6
7
# 等待 ui 对象出现 d(text="Settings").wait(timeout=3.0) # 返回布尔值 # 等待 ui 对象的消失 d(text="Settings").wait_gone(timeout=1.0)
默认超时为 20 秒。有关详细信息,请参阅全局设置
对特定的 ui 对象执行投掷 (可滚动)
horiz(水平) 或 vert(垂直)forward(向前)或backward(向后)或toBeginning(开始位置)或toEnd(结束位置)
1
2
3
4
5
6
7
8
9
10
#向前投掷(默认)垂直(默认) d(scrollable=True).fling() #垂直向后滚动 d(scrollable=True).fling.vert.forward() #没搞懂 d(scrollable=True).fling.vert.backward() #没搞懂 d(scrollable=True).fling.horiz.toBeginning(max_swipes=1000) #滚动到结束 d(scrollable=True).fling.toEnd()
在特定的 ui 对象上执行滚动 (可滚动)
horiz(水平) 或 vert(垂直)forward(向前)或backward(向后)或toBeginning(开始位置)或toEnd(结束位置)或 to 来
1
2
3
4
5
6
7
8
9
10
11
12
#向前滚动(默认)垂直(默认) d(scrollable=True).scroll(steps=10) #水平向前滚动 d(scrollable=True).scroll.horiz.forward(steps=100) #垂直向后滚动 d(scrollable=True).scroll.vert.backward() #滚动到开始水平 d(scrollable=True).scroll.horiz.toBeginning(steps=100, max_swipes=1000) #滚动垂直结束 d(scrollable=True).scroll.toEnd() #垂直向前滚动,直到出现特定的ui对象 d(scrol)
当选择器没有找到匹配项时,可以注册 watchers 来执行一些操作。
当选择器找不到匹配项时,uiautomator2 将运行所有注册的 watchers.
1
2
3
4
5
6
7
8
d.watcher("AUTO_FC_WHEN_ANR").when(text="ANR").when(text="Wait") \ .click(text="Force Close") # d.watcher(name) ## 创建一个新的名为 watcher 的程序。 # .when(condition) ## 监视程序的用户选择条件。 # .click(target) ## 对目标 UiSelector 执行单击操作
还有一个关于点击的技巧。您可以不带参数地使用 click。
1
2
3
4
5
d.watcher("ALERT").when(text="OK").click() # 一样 d.watcher("ALERT").when(text="OK").click(text="OK")
1
2
3
4
5
6
7
8
d.watcher("AUTO_FC_WHEN_ANR").when(text="ANR").when(text="Wait") \ .press("back", "home") # d.watcher(name) ## 创建一个新的名为 watcher 的程序 # .when(condition) ## 监视程序的用户选择条件 # .press(<keyname>, ..., <keyname>.() ## 按顺序按下一个键
检查指定的监视程序是否触发
1
2
3
d.watcher("watcher_name").triggered # 如果指定的监视程序被触发,则为 true,否则为 false
1
2
3
# 删除观察者 d.watcher("watcher_name").remove()
1 d.watchers #列出所有注册观察员的名单
1
2
3
d.watchers.triggered # 在任何监视程序触发时为真
1
2
3
# 重置所有触发的观察者,然后是 d.观察者。触发将为 false。 d.watchers.reset()
1
2
3
4
5
6
7
# 删除所有注册观察者 d.watchers.remove() # 删除指定的监视程序,与 d.watcher(“watcher_name”)相同。 d.watchers.remove("watcher_name")
1
2
3
# 强制运行所有注册的观察者 d.watchers.run()
当页面更新时运行所有观察者。
1
2
3
4
5
6
7
8
9
10
11
12
13
d.watcher("OK").when(text="OK").click(text="OK") # 启用自动触发监视程序 d.watchers.watched = True # 禁用自动触发监视程序 d.watchers.watched = False # 获取当前触发器监视者状态 assert d.watchers.watched == False
另外文档还是有很多没有写,推荐直接去看源码 init .py
1
2
3
4
5
6
7
# 设置每次 UI 点击后 1.5 秒的延迟 d.click_post_delay = 1.5 # 默认没有延迟 # 设置默认元素等待超时(秒) d.wait_timeout = 30.0 # 默认的 20.0
UiAutomator 中的超时设置 (隐藏方法)
1
2
3
4
5
6
7
8
9
10
11
12
13
> > d.jsonrpc.getConfigurator() > > {'actionAcknowledgmentTimeout': 500, > > 'keyInjectionDelay': 0, > > 'scrollAcknowledgmentTimeout': 200, > > 'waitForIdleTimeout': 0, > > 'waitForSelectorTimeout': 0} > > d.jsonrpc.setConfigurator({"waitForIdleTimeout": 100}) > > {'actionAcknowledgmentTimeout': 500, > > 'keyInjectionDelay': 0, > > 'scrollAcknowledgmentTimeout': 200, > > 'waitForIdleTimeout': 100, > > 'waitForSelectorTimeout': 0}
为了防止客户端程序响应超时,waitForIdleTimeout和waitForSelectorTimeout目前已改为0
Refs: Google uiautomator Configurator
这种方法通常用于不知道控件的情况下的输入。第一步需要切换输入法,然后发送 adb 广播命令,具体使用方法如下
1
2
3
4
5
d.set_fastinput_ime(True) # 切换成 FastInputIME 输入法 d.send_keys("你好 123abcEFG") # adb 广播输入 d.clear_text() # 清除输入框所有内容(Require android-uiautomator.apk version >= 1.0.7) d.set_fastinput_ime(False) # 切换成正常的输入法 d.send_action("search") # 模拟输入法的搜索
send_action 说明
该函数可以使用的参数有 go search send next done previous
什么时候该使用这个函数呢?
有些时候在 EditText 中输入完内容之后,调用press("search") or press("enter")发现并没有什么反应。send_action函数了,这里用到了只有输入法才能用的 IME_ACTION_CODE 。send_action先 broadcast 命令发送给输入法操作IME_ACTION_CODE,由输入法完成后续跟 EditText 的通信。(原理我不太清楚,有了解的,提 issue 告诉我)
1
2
d.toast.show("Hello world") d.toast.show("Hello world", 1.0) # 显示为 1.0,默认为 1.0
1
2
3
4
5
6
7
8
9
10
11
12
13
14
15
16
17
18
# [参数] # 5.0: 最大等待超时。默认的 10.0 # 缓存时间 10.0s。如果最近 10s 已经出现 toast,则返回缓存 toast。默认 10.0(将来可能会有变化) # 如果最终没有 toast,返回"default message"。默认没有 d.toast.get_message(5.0, 10.0, "default message") # 常见的使用 assert "Short message" in d.toast.get_message(5.0, default="") #清楚缓存 toast d.toast.reset() # Now d.toast.get_message(0) is None
1
2
3
4
5
6
7
8
9
<android.widget.TextView index="2" text="05:19" resource-id="com.netease.cloudmusic:id/qf" package="com.netease.cloudmusic" content-desc="" checkable="false" checked="false" clickable="false" enabled="true" focusable="false" focused="false" scrol bounds="[957,1602][1020,1636]" />
xpath 定位和使用方法
1
2
description -> content-desc resourceId -> resource-id
1
2
3
4
5
6
7
8
9
10
11
12
13
14
15
16
17
18
19
20
21
# 等待 10s d.xpath("//android.widget.TextView").wait(10.0) # 找到并单击 d.xpath("//\*[@content-desc='分享']").click() # 检查是否存在 if d.xpath("//android.widget.TextView[contains(@text, 'Se')]").exists: print("exists") # 获取所有文本视图文本、属性和中心点 for elem in d.xpath("//android.widget.TextView").all(): print("Text:", elem.text) #获取视图文本 for elem in d.xpath("//android.widget.TextView").all(): print("Attrib:", elem.attrib) #获取属性和中心点 #返回: (100, 200) for elem in d.xpath("//android.widget.TextView").all(): print("Position:", elem.center())
1
2
3
4
5
6
7
8
9
10
11
12
13
14
15
16
17
18
19
20
21
22
23
# 所有元素 //\* # resource-id 包含 login 字符 //\*[contains(@resource-id, 'login')] # 按钮包含账号或帐号 //android.widget.Button[contains(@text, '账号') or contains(@text, '帐号')] # 所有 ImageView 中的第二个 (//android.widget.ImageView)[2] # 所有 ImageView 中的最后一个 (//android.widget.ImageView)[last()] # className 包含 ImageView //\*[contains(name(), "ImageView")]


